18 Jul 2018
I was working a codebase this week and noticed a few build warnings that looked like this:
Some NuGet packages were installed using a target framework different from the current target framework and may need to be reinstalled.
Visit http://docs.nuget.org/docs/workflows/reinstalling-packages for more information.
Packages affected: <name-of-nuget-package>
The docs page is really helpful in understanding in which situations this can happen, but we’ll focus on the one situation mentioned in the warning, that is upgrading a project to target a different framework.
How it looks like before upgrading the project
Let’s imagine we have an exiting project targeting .NET 4.5.2 and the Serilog NuGet package is installed.
If we’re using packages.config and the old .NET project system, our .csproj file will contain something that looks like the following:
<Reference Include="Serilog, Version=2.0.0.0, Culture=neutral, PublicKeyToken=24c2f752a8e58a10, processorArchitecture=MSIL">
  <HintPath>..\packages\Serilog.2.7.1\lib\net45\Serilog.dll</HintPath>
</Reference>
The above snippet shows that the assembly that is being used by the project is the one living in the net45 folder of the NuGet package, which makes sense since we’re targeting .NET 4.5.2.
Upgrading the project
We then decide to upgrade the project to target .NET 4.7.1 through Visual Studio.
Immediately after doing this, we get a build error with the message shown at the beginning of this post.
On subsequent builds, though, the error goes away and we get a warning, which is consistent with what’s documented in item #4 of the docs page.
But why?!
Why do we get those warnings?
NuGet analysed all the installed packages and found out that there are more appropriate assemblies for the new target framework than the ones we’re referencing. This is because a NuGet package can contain different assemblies for different target frameworks.
Let’s inspect the content of the lib directory of the Serilog package:
└─lib
  ├─net45
  │   Serilog.dll
  │   Serilog.pdb
  │   Serilog.xml
  │
  ├─net46
  │   Serilog.dll
  │   Serilog.pdb
  │   Serilog.xml
  │
  ├─netstandard1.0
  │   Serilog.dll
  │   Serilog.pdb
  │   Serilog.xml
  │
  └─netstandard1.3
      Serilog.dll
      Serilog.pdb
      Serilog.xml
We can see different assemblies for 4 different target frameworks.
My guess is that those warnings are driven by the requireReinstallation attribute that is added for those packages in the packages.config file:
<packages>
  <package id="Serilog" version="2.7.1" targetFramework="net452" requireReinstallation="true" />
</packages>
How to fix this?
The way I find easiest to do this is by using the Package Manager Console in Visual Studio by running this command:
Update-Package <name-of-nuget-package> -Reinstall -ProjectName <name-of-project>
The most important parameter here is -Reinstall as it instructs NuGet to remove the specified NuGet package and reinstall the same version.
This gives NuGet a chance to determine which assembly is most appropriate for the current framework targeted by the project.
Running this command in our sample project would change the .csproj:
<Reference Include="Serilog, Version=2.0.0.0, Culture=neutral, PublicKeyToken=24c2f752a8e58a10, processorArchitecture=MSIL">
  <HintPath>..\packages\Serilog.2.7.1\lib\net46\Serilog.dll</HintPath>
</Reference>
And also the packages.config file:
<packages>
  <package id="Serilog" version="2.7.1" targetFramework="net471" />
</packages>
The project now references the .NET 4.6 assembly of the package, and the build warning is gone.
I don’t know how NuGet internally determines which set of assemblies is best suited for a target framework, though. There might be a matrix somewhere that shows this.
We can run the command for every package that is flagged by NuGet to make sure we reference the correct assemblies. Alternatively, if too many packages are
Conclusion
We saw that it’s easy to get rid of the warnings that can occur when a project is upgraded to target a different framework.
Do you see those warnings when you build a solution? Does a solution-wide search for requireReinstallation fetch some results?
You’re only a few commands away to being in a cleaner state! Fire away!
04 Sep 2017
Last week I was writing integration tests and I wanted to reset the underlying database to a known state before each test.
I/O-bound operations are a great use case of asynchronous tasks, so I was wondering how xUnit would help me support this.
Lifecycle events
Every .NET test framework supports some lifecycle events.
They allow you to execute operations at different times, usually on 3 different levels.
The first one, the test level, is also the most fine-grained one as it lets you run code before and after every test in a class.
I tend to use this lifecycle event when I need a clean state for every test.
In this case, I would create a new instance of the SUT.
The second level is the class or fixture level.
Like its name implies, this gives you a chance to execute operations before the first and after the last test of a specific test class.
This is useful when you want to have all the tests of a single test class to share some common state.
While I don’t use it as often as the two others, a good use case for this one would be when I test a class that doesn’t hold any state, so creating new instances for each test wouldn’t add any value.
The last one, I’ll call the suite level; this one allows you to run some code before the first test and after the last test of the whole suite.
This comes in handy when you have some initialisation code that needs to run only once.
Usually, it will match what you do at the very start of your application.
I use this one to configure my AutoMapper mappings or, if I write integration tests, to run migrations on the underlying database.
How to use lifecycle events with xUnit
xUnit supports all these options, and you can read about how to use them on the official documentation page.
One thing you’ll notice is that initialisation and cleanup mechanics fit the .NET semantics; the former is done in the constructor of the class, the latter by optionally implementing the IDisposable interface.
Unfortunately, at the time of writing, neither do constructors nor IDisposable support asynchronous, Task-based operations without somehow blocking the running thread.
IAsyncLifetime to the rescue
Fortunately, xUnit has us covered with a special interface.
Its declaration is very simple (see the official one):
public interface IAsyncLifetime
{
    Task InitializeAsync();
    Task DisposeAsync();
}
If either your test class, class fixture or collection fixture implement this interface, xUnit will execute the appropriate methods at the right time.
InitializeAsync will be called right after the constructor is invoked, and DisposeAsync just before Dispose - if it exists - is called.
How I used it
To have each of my integration tests run on top of a known state, I wanted clean up the SQL database before each test.
To do this I used yet another open-source library created by Jimmy Bogard called Respawn.
He decided, after porting it to .NET Standard 2.0, to make the Reset method async.
This was the perfect opportunity to use IAsyncLifetime, and because a picture some code is worth a thousand words:
public class TestClass : IAsyncLifetime
{
    private readonly string _connectionString;
    private readonly Checkpoint _checkpoint;

    public TestClass()
    {
        _connectionString = GetItFromConfigurationFile();
        _checkpoint = new Checkpoint();
    }

    public Task InitializeAsync() => _checkpoint.Reset(_connectionString);

    [Fact]
    public async Task TestOne()
    {
        // Asynchronous operations again
    }

    [Fact]
    public async Task TestTwo()
    {
        // Asynchronous operations again
    }

    public Task DisposeAsync => Task.CompletedTask;
}
06 Mar 2017
Microsoft recently added Linux agents to the VSTS hosted pool in preview. These agents are Docker containers and have the specifity of reusing the host Docker instance from which they were created.
We’ll see in this post how we can take advantage of such capability.
Use case
At Readify, we’ve been working on an internal application that uses OrientDB, a graph database engine. People working on this project agreed to use the OrientDB Docker container as opposed to having to install Java and a local instance of OrientDB on their development machines.
While this works great for development, we couldn’t apply it to the VSTS CI build to run integration tests as the agents were Windows-based and didn’t have Docker installed. The workaround was to spin up a local instance of OrientDB if an existing one couldn’t be found. This means that developers could still run tests as they’d have an existing, reachable instance of OrientDB running in Docker, while during the CI build a local instance would be created.
This worked fine, but required more code to create the new OrientDB instance, and also meant we didn’t have consistency between the dev and CI setups. When the Linux Hosted pool showed up on the Readify tenant of VSTS, we decided to give it a go and try to run OrientDB in Docker.
Running a Docker container as part of the CI build
Out of the box, VSTS doesn’t provide tasks to run Docker workloads. Fortunately, an extension backed by Microsoft exists on the Visual Studio Marketplace. The code is hosted in the vsts-docker GitHub repo for the curious ones who want to have a look at it.
The extension brings 3 new tasks:
- Docker: to build, push or run Docker images. It can also run custom Docker commands
- Docker Compose: to build, push or run multi-container Docker applications
- Docker Deploy: this one allows use to deploy single or multi-container Docker applications to Azure Container Services
We are here only interested in running a Docker container, so the first task will suffice our needs.
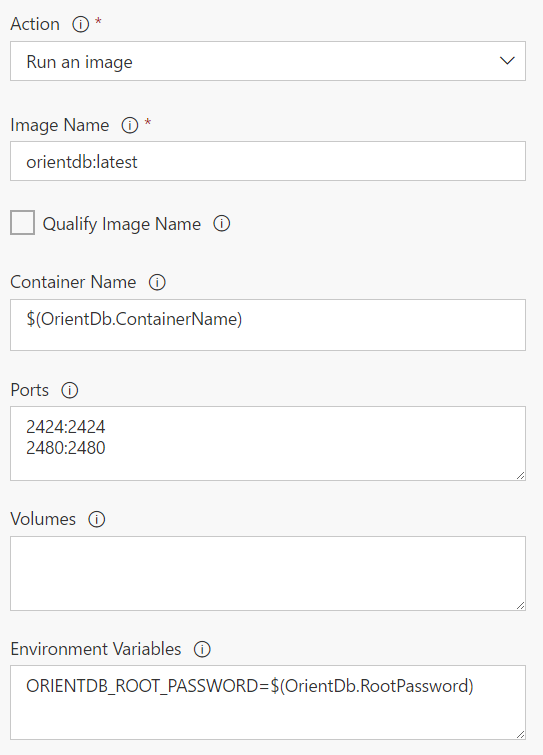
As you can see, it takes the parameters you would expect:
- The name of the image
- The name of the container
- Port mapping
- Volume mapping
- Environment variables
Remember that if this doesn’t suit your needs, you can always fall back to running a custom docker command that would allow you to specify all the parameters yourself.
Connecting to the Docker container
There was an issue where the tests couldn’t connect to the OrientDB database when running on the CI build. The error message was Connection refused 127.0.0.1:2424. It took a while to figure out, but since the VSTS agent is not the Docker host, it’s normal that the OrientDB container is not reachable through localhost. This means we need to figure out the IP address of the OrientDB container and connecting using this IP.
Getting the IP of the OrientDB container
That was easy. I mean, the first Google search pointed to a serverfault question that explains how. docker inspect returns information about the container, and the --format option allows you to specify what portion you want back. To only get the IP address, you can run:
docker inspect --format '{{range .NetworkSettings.Networks}}{{.IPAddress}}{{end}}' container_name_or_id
Have the tests use this IP
The tests get the OrientDB connection information through the configuration model of ASP.NET Core to get information about how to connect to OrientDB. It’s a provider-based model, which means you can add several sources of different types to the configuration. Providers added last can override configuration values added by previous providers; in other words, the last provider has the highest priority.
During development, all the settings are read from a JSON file. This can’t work for CI since the IP address of the OrientDB container could change between runs - even though a few tries showed it wasn’t the case. One option to override the hostname specified in the JSON file is to create an environment variable using the same name as the config setting. Environment variables are added last so they’ll take precedence. The configuration code then looks like:
var configuration = new ConfigurationBuilder()
    .SetBasePath(Directory.GetCurrentDirectory())
    .AddJsonFile("appsettings.json")
    .AddEnvironmentVariables()
    .Build();
and here’s the JSON file:
{
  "OrientDB": {
    "Port": "2424",
    "Username": "root",
    "Password": "verysecurepassword",
    "Host": "localhost"
  }
}
The goal is then to create an environment variable with the name OrientDB:Host and set it to the IP address of the OrientDB container. We saw that getting the IP was easy, but how do we create an environment variable as part of the build? VSTS has the concept of logging commands. Emitting specific text through the standard output means VSTS will parse that output and react appropriately. One of these commands can create an environment variable, the format is the following:
##vso[task.setvariable variable=<variable-name>;]<variable-value>
The solution was then to include a bash script task in the CI build - remember, this is a Linux agent we’re running on - to get the IP and output the appropriate logging command. Overall it looks something like:
#!/bin/bash

IP=`docker inspect -f '{{range .NetworkSettings.Networks}}{{.IPAddress}}{{end}}' orientdb`
echo "##vso[task.setvariable variable=OrientDB:Host;]$IP"
The tests now happily pick up the container’s IP address from the environment variable via the ASP.NET Core configuration model.
Other challenges when running in Linux
A few other things had to be changed for the build to run smoothly. The first one was folder separators in the various build tasks, as Linux uses /. We also had some code where backslashes were used in strings to represent paths; switching over to Path.Combine fixed this.
The file system on Linux is also case-sensitive, so myproject.tests and MyProject.Tests are two different things. We had a few occurences of this that needed updating.
Finally, we have some scripts in the git repository to setup dummy data before running each integration test. They are prefixed with numbers to indicate you need to run them sequentially for them to work properly. We found out that, on Linux, Directory.EnumerateFiles doesn’t return files in alphabetical order, while it does on Windows. We had to sort them manually before iterating over them.
Overall, it took some time to get this working, and at some point a lot of trial & error when running the builds to figure out what was happening, but we now have a CI build that is consistent with what happens during development.
18 Jan 2017
Supporting links:
I blogged a few months ago about some tricks I learned about Web Deploy. While the integration for web projects is excellent thanks to WPP - Web Publishing Pipeline - we cannot say the same for console applications.
In this post, we will see how we can take advantage of Web Deploy to package and deploy console applications.
Packaging
When we build a console application, all the necessary files are output to a single folder which contains the executable, the configuration file and the necessary assemblies.
I didn’t know how Web Deploy was used by WPP to package a web application, so I read the documentation. In essence, Web Deploy can synchronise two data sources, each of them using a particular provider.
In our case, the source is the content of a folder, which is handled by the dirPath provider. The destination is a WebDeploy package, and for this matter, we can use the package provider. Here is a command we can execute to achieve this:
msdeploy.exe -verb:sync -source:dirPath="C:\source-directory" -dest:package="C:\destination-package.zip"
The good news is that we can declare parameters as we do for web applications with the declareParamFile operation. This allows us to set parameters values at deployment time for application settings or connection strings:
msdeploy.exe -verb:sync -source:dirPath="C:\source-directory" -dest:package="C:\destination-package.zip" -declareParamFile:"C:\parameters.xml"
This step is very easy to integrate with any CI server you might use. In the end, we get a parameterised package, ready to be deployed.
Deployment
What is the goal of the deployment of a console application? Most of the time, it will be to have all the necessary files in a specific folder so the program can run. Going from a package to a folder is the exact opposite of what we did to package the application.
It is indeed just a matter of switching the source and destination providers, and specifying values for the parameters we declared during the packaging phase. To do this, we use the setParamFile operation:
msdeploy.exe -verb:sync -source:package="C:\destination-package.zip" -dest:dirPath="C:\destination-folder" -setParamFile:"C:\parameters-values.xml"
And voilà, we’ve successfully packaged up a console application in a single package and deployed it with specific parameters. You can find sample code on my GitHub repository where I use PowerShell scripts to invoke Web Deploy.
18 Nov 2016
Supporting links:
The client I’m working for right now doesn’t do automated deployments. This means that a person manually deploys all the applications. However, while building the API I talked about in a previous post, I’m trying to make the dpeloyment process as easy as it can be. Web Deploy is a proven way of deploying ASP.NET-based applications.
In this post I’ll walk you through the process I took so that the deployment is as painless as possible.
Setup
Visual Studio has built-in tooling for creating Web Deploy packages. If you “right-click → Publish” an ASP.NET project, you can define a publish profile which you can later invoke with MSBuild. In my case, I selected a Web Deploy Package as the output. This gives us a starting point.
Connection strings
As I don’t know the credentials of the service accounts that are used on the different environments, I want the person deploying the package to type them when deploying the package. By default, Visual Studio - or, more precisely, the Web Publishing Pipeline which is invoked by a .targets file referenced in the .csproj - tokenizes the connection strings it finds in the web.config. While this is very nice, the generated names of the parameters are not so nice. The convention is to name them [name of the connection string]-Web.config Connection String. I don’t find this really user-friendly.
Luckily for us, there’s a way for us to disable that. I think everyone has googled this at least once, so it probably won’t be a surprise. You can disable that tokenization through an MSBuild property that WPP checks during the process. Just edit your .csproj and add the following property:
<AutoParameterizationWebConfigConnectionStrings>false</AutoParameterizationWebConfigConnectionStrings>
Happy days? Well, only partially, at least in my case. This worked for the SQL Server connection string, but we also use IBM DB2, and that one was still getting tokenized. I think this has to do with the Visual Studio tooling not handling other ADO.NET providers well, apart from System.Data.SqlClient. I tracked this down to the .pubxml file, where there was a subtle difference between the two connection strings definitions:
<ItemGroup>
  <MSDeployParameterValue Include="$(DeployParameterPrefix)Db2-Web.config Connection String" />
  <MSDeployParameterValue Include="$(DeployParameterPrefix)SqlServer-Web.config Connection String">
    <UpdateDestWebConfig>False</UpdateDestWebConfig>
  </MSDeployParameterValue>
</ItemGroup>
Somehow this kept the DB2 connection string being tokenized. Adding the UpdateDestWebConfig property like for the SQL Server one took care of it.
OK, but now connection strings can’t be entered when you deploy the package
Correct, we’re only halfway there.
Another thing I found was that you can hook in the Web Publishing Pipeline by creating a parameters.xml file in your web project, as shown on this page. In our case, it’s a matter of adding 2 parameters for our connection strings:
<parameters>
  <parameter name="SQL Server connection string"
             description="The connection string to the SQL Server database"
             tags="SqlConnectionString">
    <parameterEntry kind="XmlFile"
                    scope="\\Web\.config$"
                    match="/configuration/connectionStrings/add[@name='SqlServer']/@connectionString" />
  </parameter>

  <parameter name="DB2 connection string"
             description="The connection string to the DB2 database"
             tags="SqlConnectionString">
    <parameterEntry kind="XmlFile"
                    scope="\\Web\.config$"
                    match="/configuration/connectionStrings/add[@name='Db2']/@connectionString" />
  </parameter>
</parameters>
Our parameters now have pretty names! I used the same approach for other parameters, like the log file path.
A small twist
There’s a special value in the web.config that contains the name of the environment the application is deployed on. This allows, for example, to disable the swagger endpoint exposing metadata on the API if it’s deployed in production. In my C# code I have an enum to represent the possible environments:
public enum Env
{
    Development,
    Test,
    Production
}
I use Enum.TryParse to avoid exceptions and fall back to Development if there’s no match, but to minimise the risk of errors we can show a nice dropdown list in IIS manager when the package is getting deployed:
<parameter name="Environment"
           description="The environment on which the application is about to be deployed">
  <parameterValidation kind="Enumeration"
                       validationString="Test,Production /">
  <parameterEntry kind="XmlFile"
                  scope="\\Web\.config$"
                  match="/configuration/appSettings/add[@key='Environment']/@value" />
</parameter>
This will show a dropdown list containing only the values I selected. No errors possible if you deploy the package with the UI. This one was tricky because the official documentation uses the type attribute on the parameterValidation, and it doesn’t work. Hopefully this answer on StackOverflow worked.
If you made it this far, then first: thank you! If you made it this far thinking “duh, just put all those connection strings and parameters in a Web.[Configuration].config and you’re good to go”, then I hope you’ll read the next few lines.
I think web.config transformations are amazing. Really. They make it really easy to make changes here and there when you publish a package. But in my opinion they shouldn’t be used to replace information like connection string and application settings on-the-fly. Here’s why.
You don’t have a single package anymore
Ideally, you want to embrace the Build once, deploy many mantra which means that a single package can be deployed to all the environments - up to Production. Having web.config transformations for connection strings means you can’t deploy your test package to production because the connection string is hardcoded in the web.config. Bummer. You have to build another one for production, but how can you be sure they contain exactly the same version of your code?
This is why, for example, Octopus Deploy took a different approach. All the configuration-specific transformation files are included in the deployment package, and only when actually deploying it are the transformations run. Winning!
It’s a maintainability nightmare
In order to have transformations being applied, you need to have a corresponding MSBuild - hence Visual Studio - configuration. It’s a bit of a pain to maintain because every new project you add will only have the default Debug and Release configurations.
This is probably the most important one. You don’t want to have your SQL production credentials visible to everyone. Ever.
So what are they good for, then?
I think they’re really good for things you want to apply to all environments. The default Web.Release.config only removes the debug attribute on the compilation element. I think this is a great example, as leaving it can have performance impact on your application. I can’t find others off the top of my head, but I’m sure there are.
