Applications in Azure Active Directory have an option labelled “user assignment required”. In this blog post, we’ll talk about how this affects an application.
💡 Quick heads-up — all the examples in this blog post are based on a web application using AAD as its identity provider through the OpenID Connect protocol.
Context
By default, applications created in Azure Active Directory have the “user assignment required” option turned off, which means that all the users in the directory can access the application, both members and guests.
While this might sound like a sensible default, we find ourselves at Readify with a growing number of guests in the directory as we collaborate with people from other companies. Some of our applications contain data that should be available to Readify employees only, so we decided to make use of the “user assignment required” option.
To access this option, in the Azure portal, go to “Azure Active Directory > Enterprise applications > your application > Properties” and the option will be displayed there.
Some of the behaviour changes were expected, but others were not! Let’s go through them.
1. People not assigned to the application can’t use it
Well, duh, isn’t that what the option is supposed to do?!
You’re absolutely right! If someone that hasn’t been explicitly assigned to the application tries to access it, then AAD will reject the authorisation request with a message similar to the following:
AADSTS50105: The signed in user ‘Microsoft.AzureAD.Telemetry.Diagnostics.PII’ is not assigned to a role for the application ‘<application-id>’ (<application-name>)
The message is straightforward and the behaviour expected.
There are several ways to assign someone to the application. I typically use the Azure portal, navigate to “Azure Active Directory > Enterprise applications > my application > Users and groups” and add them there.
In other words, if you assign a group to an application, only the direct members of that group will gain access to the application. So instead of using our top-level “all employees” type of group, we had to assign several lower-level groups which only had people inside of them.
3. All permissions need to be consented to by an AAD administrator
Applications in Azure Active Directory can request two types of permissions:
the permissions which are scoped to the end user, like “Access your calendar”, “Read your user profile”, “Modify your contacts” — these permissions are shown to the user the first time they access an application, and they can consent to the application performing those actions on behalf of them;
another type of permissions usually have a broader impact, outside of the user’s scope, like “Read all users’ profiles” or “Read and write all groups” — those permissions need to be consented to by an AAD administrator on behalf of all the users of the application.
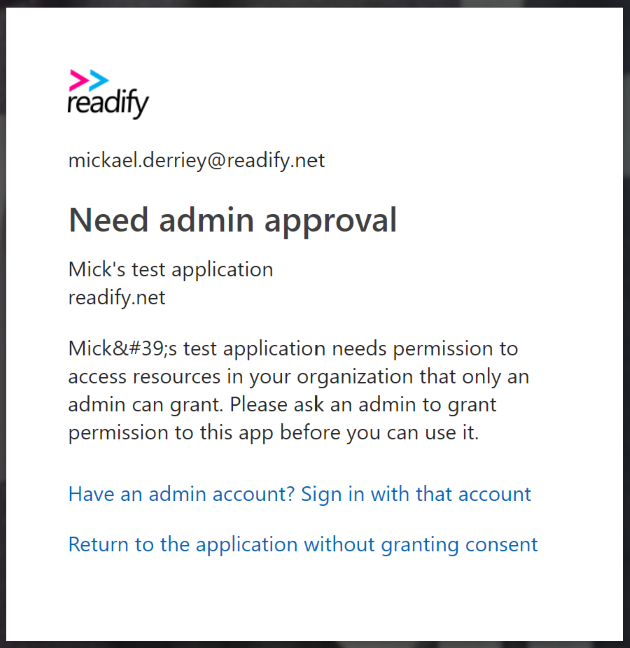
When the access to the application is restricted via the “user assignment required”, an Azure Active Directory administrator needs to consent to all the permissions requested by the application, no matter whether users can normally provide consent for them.
As an example, I created an application with only one permission called “Sign in and read user profile”. After enabling the “user assignment required” option, I tried to log in through my web application and got prompted with a page similar to the screenshot below:
While I don’t fully understand that behaviour, it is alluded to in the tooltip associated with the “user assignment required” option, shortened for brevity and emphasis mine.
This option only functions with the following application types: […] or applications built directly on the Azure AD application platform that use OAuth 2.0 / OpenID Connect Authentication after a user or admin has consented to that application.
The solution is to have an AAD admin grant consent to the permissions for the whole directory. In the Azure portal, go to “Azure Active Directory > Enterprise application > your application > Permissions” and click the “Grant admin consent” button.
4. Other applications not assigned to the application can’t get an access token
It’s not uncommon to see integration between applications. As an example, an application “A” could run a background job every night and call the API of application “B” to get some data.
Before we enabled the “user assignment required” option in application “B”, it was possible for application “A” to request an access token to AAD, allowing it to call the API of application “B”. This is done using the client_credentials OAuth2 flow, where application “A” authenticates itself against AAD with either a client secret (it’s like a password, but an app can have different secrets) or a certificate.
However, after requiring users to be assigned to the application “A”, the token request returns the following error:
AADSTS501051: Application ‘<application-b-id>’ (<application-b-name>) is not assigned to a role for the application ‘<application-a-id>’ (<application-a-name>).
While it’s similar to the first error we talked about in this post, the resolution is different, as the Azure portal doesn’t let us assign applications to another application in the “User and groups” page.
To create a role aimed at applications, we’ll use the “Manifest” page and replace the appRoles property with the following:
"appRoles":[{"allowedMemberTypes":["Application"],"description":"Consumer apps have access to application A data","displayName":"Access application A","id":"1b4f816e-5eaf-48b9-8613-7923830595ad","isEnabled":true,"value":"Access"}]
4.2 Request that permission in application “B”
Wait, we were talking about creating a role and now we request a permission?
I agree, sorry about the confusion, but the following will hopefully make sense. There’s a change in the terminology we use because assigning that role to application “B” is actually done the other way around, by requesting that role from the settings of application “B”.
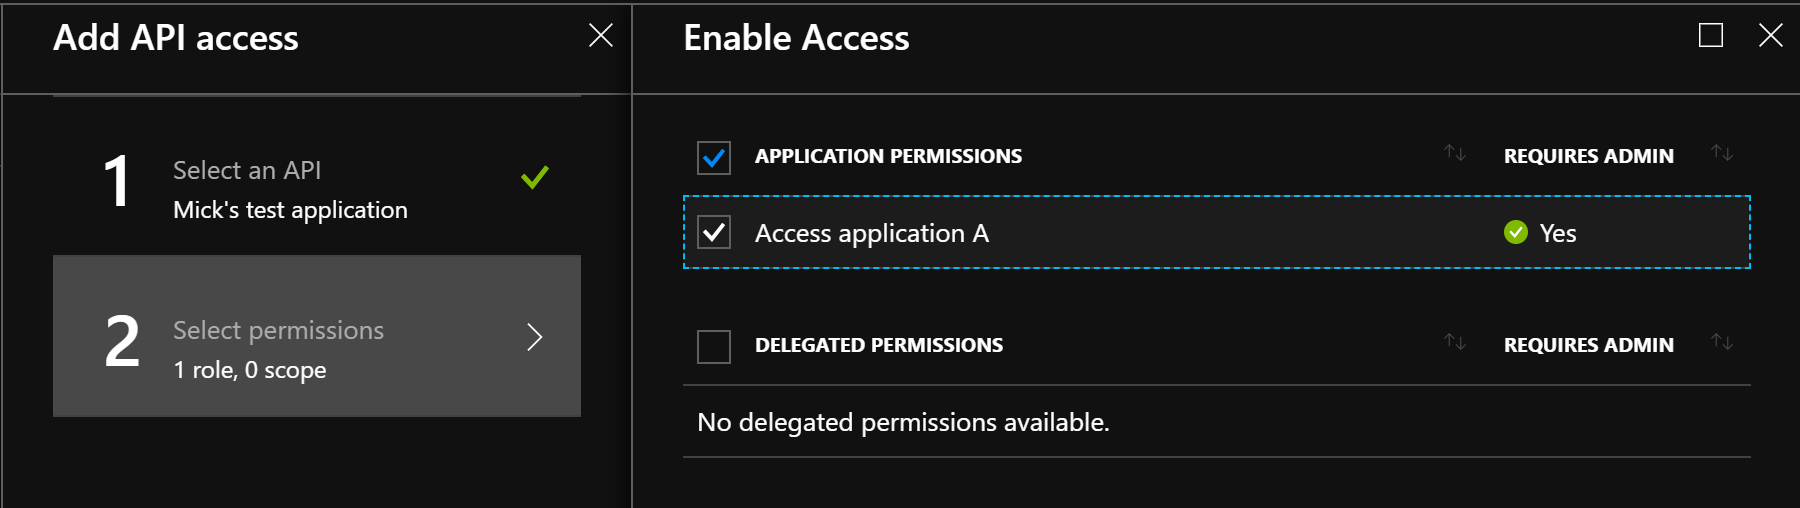
To do so, we navigate in the Azure portal to “Azure Active Directory > App registrations > application “B” > Required permissions” and then click on the “Add” button. In the new “Add API Access”, we look for application “A”, select it, then pick the “Access application A” application permissions we created in the previous step:
💡 Another heads-up — at the time of writing, the Azure portal has a new App registrations experience in preview. The steps mentioned above are for the GA App registrations blade, but the experience is pretty similar in the preview one. If you want to try it out, follow “App registrations (preview) > application “B” > API permissions > Add a permission > APIs my organization uses > application “A” > Application permissions”, then finally pick the “Access application A” one.
4.3 Grant consent for application “B” to access application “A”
Because there’s no user involved, application permissions automatically require admin consent. Follow the steps taken previously, but this time for application “B”. After doing so, the token request from application “B” to access application “A” will work as expected.
Conclusion
When we first used that “user assignment required” option, I was only expecting unassigned users to be bounced by AAD when trying to log in. Little did I know we would encounter all those “bumps” along the way 🤣.
This was a great learning opportunity, and hopefully it’ll be useful to others.
Here’s what I learnt last week because of a copy/paste error 🤣
Did you know Microsoft provide Docker images for the VSTS agent?
The microsoft/vsts-agent image allows you to run the VSTS agent in a Docker container.
A colleague of mine who ran out of free build minutes on VSTS was trying to start one up.
Unfortunately, he always ran into the same issue, and was presented this error message:
error: could not determine a matching VSTS agent - check that account '<tenant-name>' is correct and the token is valid for that account
Even though the error message is very explicit, we thought the token was valid since it had just been generated and started to think that maybe the environment variables we were passing in to the container were wrong.
We landed on a start.sh file where we found our error message, and tried to figure out what was the execution flow.
Here’s the portion of the script we focused on:
echo Determining matching VSTS agent...
VSTS_AGENT_RESPONSE=$(curl -LsS\-u user:$(cat"$VSTS_TOKEN_FILE")\-H'Accept:application/json;api-version=3.0-preview'\"https://$VSTS_ACCOUNT.visualstudio.com/_apis/distributedtask/packages/agent?platform=linux-x64")if echo"$VSTS_AGENT_RESPONSE" | jq .>/dev/null 2>&1;then
VSTS_AGENT_URL=$(echo"$VSTS_AGENT_RESPONSE"\
| jq -r'.value | map([.version.major,.version.minor,.version.patch,.downloadUrl]) | sort | .[length-1] | .[3]')fi
if[-z"$VSTS_AGENT_URL"-o"$VSTS_AGENT_URL"=="null"];then
echo 1>&2 error: could not determine a matching VSTS agent - check that account \'$VSTS_ACCOUNT\' is correct and the token is valid for that account
exit 1
fi
The first block seems to be making an HTTP request with the curl tool.
I tried making that request against my VSTS tenant with a personal access token I just generated, and here’s the response I got back:
Interesting! The container asks VSTS which agents are available for the linux-x64 platform.
And then it struck us: the Docker image doesn’t have the VSTS agent binaries in it, which, when we think about it, makes a lot of sense.
Doing so would mean the release cycle of the agent would need to be in line with the release cycle of the Docker image, which is less than ideal.
To work around this, the Docker container, upon start, wil install the agent and run it.
But we’re not there yet. Let’s have a look at the second block:
This is kind of Chinese to me, but knowing that the $VSTS_AGENT_RESPONSE variable should contain the JSON response displayed above, it seems to be running the jq program on it with some parameters.
A quick search away and we found from the official website that jq is a lightweight and flexible command-line JSON processor.
And they have an online playground, too, great, let’s try it.
We filled the JSON and the filter, checked the Raw output option — which we guessed is the equivalent of the -r parameter — and the result was https://vstsagentpackage.azureedge.net/agent/2.136.1/vsts-agent-linux-x64-2.136.1.tar.gz.
We analysed the query more closely and figured that it was a way to get the latest version of the agent. Neat!
Let’s decompose the query:
.value expands the value property of the JSON object; the result of that is then an array of objects;
it’s then piped to map([.version.major,.version.minor,.version.patch,.downloadUrl]) which executes a projection over each object, selecting 4 properties on each of them, 3 being the version portions, the last one being the download URL; at this point, the result is an array of objects, each containing these 4 properties;
these objects are then being sorted; our assumption here is that they’re sorted based on the order of the properties, so first by the major version, then the minor and finally the patch; the result is the same array, but it’s sorted so that the first object is the smallest version and the last one is the greatest;
.[length-1] selects the last item of the array, so effectively the one with the latest version; now the current result is an object with 4 properties;
finally we assumed that the last part, .[3], selects the fourth property of the object, being the download URL
All this done in a single line!
The result of this query is stored in the VSTS_AGENT_URL variable.
On to the last block:
if[-z"$VSTS_AGENT_URL"-o"$VSTS_AGENT_URL"=="null"];then
echo 1>&2 error: could not determine a matching VSTS agent - check that account \'$VSTS_ACCOUNT\' is correct and the token is valid for that account
exit 1
fi
If the VSTS_AGENT_URL variable doesn’t exist of if it’s null, then the error message gets displayed.
At this stage, we were scratching our heads 🤔
We followed the execution flow and it all seemed right.
We decided to double-check whether the token was correct, and guess what, it wasn’t!
After generating it, it was pasted into OneNote which capitalised the first letter, which made it invalid.
It was then copied from OneNote into the docker run command, which explained why we saw the error.
Two things I’m taking out of this situation:
Check my basics — absolute basics — when you’re encountering an issue. Is the cable disconnected? Is the token valid? Is the laptop connected to the Internet? I know I tend to assume the basics are working as expected and go head first into what I think is a non trivial problem;
I’m still really happy we went on this investigation because I got a better understanding of how that specific container works. And it took us maybe 30 minutes to figure out it was the token which was invalid. So another thing I’ll remind myself is to timebox these deep-dives so I don’t spend too much time when the fix is simple.
Here’s a quick one.
You know how in ASP.NET Core there’s this new configuration model where you can get values from different providers?
If not, I suggest you read the official documentation on it which is absolutely great!
A primer
For the purpose of this post, let’s imagine an ASP.NET Core MVC application that reads configuration from these sources:
the appsettings.json file; and
the environment variables
The order matters here, because if several providers export the same value, the last one wins.
In our case, imagine that the JSON file is the following:
Let’s also imagine that we have an environment variable called CONNECTIONSTRINGS:SQLCONNECTION with the value Data Source=different-server; Initial Catalog=different-database; Integrated Security=SSPI.
In that case, the value coming from the environment variable wins and will be the one returned from the configuration.
On to our interesting case
Azure App Service allows you to specify both application settings and connection strings so that you don’t need to deploy your application again if you want to change some configuration settings.
The documentation states that connection strings will be exposed as environment variables which will be prefixed based on which type of connection string you create
Type of connection string
Prefix
SQL Server
SQLCONNSTR_
MySQL
MYSQLCONNSTR_
Azure SQL
AZURESQLCONNSTR_
Custom
CUSTOMCONNSTR_
My colleague Dom had an ASP.NET Core web application deployed to an Azure App Service. This application was sourcing a connection string from the ConnectionStrings:SqlConnection configuration key.
I was very surprised when he created an Azure SQL connection string named SqlConnection in his App Service and his app used it to connect to his Azure SQL database!
If we follow the docs, the environment variable corresponding to this connection string would be named AZURESQLCONNSTR_SQLCONNECTION. It was the case as we double-checked that in the Kudu console where you can see all the environment variables of your App Service.
So how did it work?!
I know. Much confusion.
My understanding was that only an environment variable named CONNECTIONSTRINGS:SQLCONNECTION would override the one that was present in the appsettings.json configuration file.
What next?
Lucky for us, all that configuration code is open-source and available on the aspnet/Configuration repository on GitHub.
This contains both the abstractions and several providers: JSON, XML and INI files, environment variables, command line arguments, Azure Key Vault, etc…
Next step is digging in the environment variables provider to see if there’s anything of interest.
And there is!
Having a look at the EnvironmentVariablesConfigurationProvider class, it all falls into place.
The provider checks for all the prefixes present in the table above and replaces them with ConnectionStrings: when feeding the data into the configuration model.
This means that an environment variable named AZURESQLCONNSTR_SQLCONNECTION is fed into the configuration system with the ConnectionStrings:SqlConnection value.
This explains why creating a connection string in the Azure App Service made the application change its connection string.
I’m happy because I learnt something new.
Bonus
I actually learnt something else.
Double underscores in environment variables will be replaced by the configuration delimiter, :, when fed into the configuration model.
That’s shown by the NormalizeKey method.
This means that if we were not using Azure App Service, we could override the connection string with two environment variables: ConnectionStrings:SqlConnection and ConnectionStrings__SqlConnection.
I recently got to work on an Azure migration project where we took the lift & shift approach as a first step.
This means that the solution, while running in Azure, was still making use of virtual machines.
We decided to create two separate release pipelines:
the one that would provision the infrastructure in Azure — this one would be run only once for each environment as we don’t plan on tearing down/bringing up the resources for each application deployment; and
the application deployment one, which would update the applications bits on the virtual machines created in the first step — this one would be run much more frequently
The second one, that deploys the applications to the virtual machines, runs from a cloud-hosted agent provided by VSTS and uses WinRM to connect to the VMs to perform all the necessary steps, like copy scripts and packages over, configure IIS, deploy the packages, etc…
When I presented that solution to a few colleagues, one of them asked:
Why didn’t you install VSTS agents on the VMs? It’s more secure since it uses a pull model (instead of a push one), meaning you wouldn’t need to punch holes in the firewall for the cloud agent to connect to the virtual machines.
They have a very good point!
I might add that another benefit of running the release directly from the VMs would likely speed up the process, as the artifacts would be downloaded automatically on the VM at the start of the release, and each and every step in the release wouldn’t need to set up a WinRM connection to the VM.
So I started looking for a way to do exactly this.
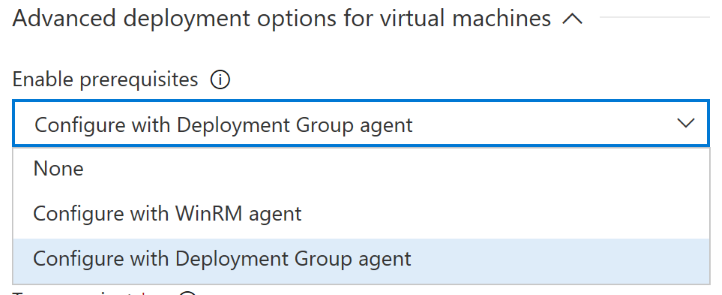
We are using the built-in Azure Resource Group Deployment task, and one of the arguments called Enable Prerequisites allows to install the VSTS deployment group agent on all the VMs declared in your ARM template.
What’s this deployment group agent?
VSTS introduced some time ago the concept of deployment group, which is a bunch of target machines that all have an agent installed and can be assigned tags.
I find it’s similar to the way Octopus Deploy works.
When using deployment groups, the release pipeline is made of deployment group phases, where each phase runs on servers with specific tags.
This means you could execute different tasks on your database servers and on your web servers, or you could decide to split them based on which application they run.
If you’re more interested in this, I suggest you read the official documentation.
Going back to the VSTS task, here’s the property that allows you to install the agent on the virtual machines:
The setting that drives the installation of the deployment group agent on VMs
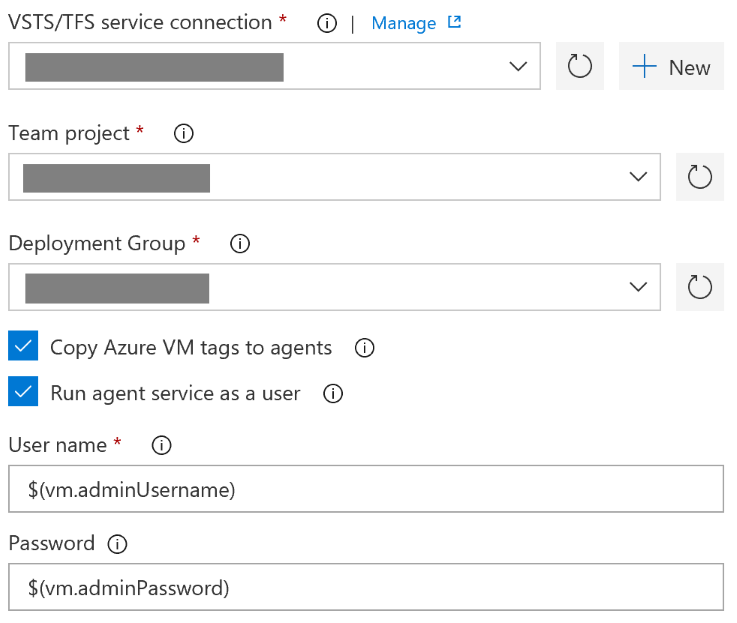
After selecting that option, we’re prompted to fill in a few additional properties:
a VSTS service endpoint;
a team project within the previously selected VSTS instance;
a deployment group that belongs to the selected team project;
whether we want to copy the tags from each VM to the associated agent; and finally
whether we want to run the VSTS agent service as a different user than the default one
The settings required to install the deployment group agent
This all worked out as expected, and going back to my deployment group after the privisionning of the VMs, I could see as many agents as VMs that were created.
The next task was to modify the application deployment pipeline to adapt it to the fact that the process would now run directly on the virtual machines, and remove the rules that allowed inbound traffic for WinRM.
It’s also worth noting that the process now needs to contain deployment group phases as opposed to agent phases.
Using this approach has several benefits:
increased security, as no inbound traffic is required to the VMs;
a quicker release process as there’s no need for WinRM connections for each step;
it also handles potential changes in the infrastructure: if we decide to increase the number of VMs for an application for increased reliability, the fact that the application deployment pipeline is based on VM tags means this will be transparent
Going deeper
While the main goal was achieved, I had a few questions in my mind:
how does the VSTS task install the VSTS agent on all the VMs?
why does the task require a VSTS service endpoint if the agent is to be connected to the same VSTS instance as the one where the release runs?
As all the VSTS tasks are open-source — if you didn’t know, you can find the source code in the Microsoft/vsts-tasks repository on GitHub — I decided to take a look under the hood.
The task.json file contains metadata about the task, like its name, the different input properties — and the rules around conditional visibility, like show setting B only when setting A has this value — and the execution entry point to invoke when the task need to run.
And surprise! The VSTS task delegates the installation to the TeamServicesAgent Azure VM extension, as these two functions show. This answers the second question I had: the VSTS task needs a VSTS service endpoint to generate a PAT to register the agent as the underlying Azure VM extension rquires one.
The good thing about the fact that the agent installation is handled with an Azure VM extension is that we can easily reduce the coupling to this task by deploying the extension ourselves in the ARM template. This means that if we decide to move away from the VSTS task and do the deployment with either PowerShell scripts or the Azure CLI, we won’t be losing anything.
ASP.NET Core 2.1 brought a new feature that is generic hosts. They allow to write apps that rely on ASP.NET Core concepts like logging, configuration and built-in DI but that are not web applications.
I was playing with them yesterday and wanted to see if I could easily integrate the Autofac IoC container with it. After looking at the ASP.NET Core integration page in the Autofac docs, I came up with code that looks like the following:
usingSystem.Threading.Tasks;usingAutofac;usingAutofac.Extensions.DependencyInjection;usingMicrosoft.Extensions.Configuration;usingMicrosoft.Extensions.Hosting;internalclassProgram{publicstaticasyncTaskMain(string[]args){awaitnewHostBuilder().ConfigureServices(services=>services.AddAutofac()).ConfigureContainer<ContainerBuilder>(builder=>{// registering services in the Autofac ContainerBuilder}).UseConsoleLifetime().Build().RunAsync();}}
This all looks pretty straightforward and follows the docs, but at runtime the application threw an exception with the following error message:
System.InvalidCastException: 'Unable to cast object of type 'Microsoft.Extensions.DependencyInjection.ServiceCollection' to type 'Autofac.ContainerBuilder'.'
That’s interesting, given:
services.AddAutofac() registers an AutofacServiceProviderFactory instance as IServiceProviderFactory as we can see here; and
the code tells us that the CreateBuilder method of AutofacServiceProviderFactory returns an instance of ContainerBuilder
So I cloned the aspnet/Hosting repo, checked out the 2.1.1 tag, opened the solution in Visual Studio, and started readong through the HostBuilder.cs file.
And there it was: the HostBuilder class uses a ServiceProviderAdapter that wraps the IServiceProviderFactory. This means that registering an IServiceProviderFactory like services.AddAutofac() does conveys no meaning to a HostBuilder.
Luckily, while going through the code, I also found the UseServiceProviderFactory method on the HostBuilder class. The difference is that this one wraps the provided factory within the adapter.
The code then became:
usingSystem.Threading.Tasks;usingAutofac;usingAutofac.Extensions.DependencyInjection;usingMicrosoft.Extensions.Configuration;usingMicrosoft.Extensions.Hosting;internalclassProgram{publicstaticasyncTaskMain(string[]args){awaitnewHostBuilder().UseServiceProviderFactory(newAutofacServiceProviderFactory()).ConfigureContainer<ContainerBuilder>(builder=>{// registering services in the Autofac ContainerBuilder}).UseConsoleLifetime().Build().RunAsync();}}
And it worked!
I don’t know why the generic host uses an adapter around the service provider factory — I asked the question on Twitter, time will tell if we get the answer.
The morale here is very close to the one in Andrew’s post: don’t assume everything you know about web host is true or will work with generic host.