18 Nov 2016
I’m currently working at a client where I build a Web API. It’s important for them that every call the API can be tracked for tracing/debugging purposes. The perfect candidate for that is a correlation ID, which uniquely identifies each request.
Now there’s 2 things we have to take care of for it to be usable later:
- communicate it to the client
- include it in every log entry of each specific request
In this post we’ll see how to achieve that.
Communicating the correlation ID back to the client
An easy way to do this is to include it in a custom header of the HTTP response. Since it’s a global behaviour, we can use a message handler to do this. I like to think about Message Handlers as a pipeline you have access to before the request makes its way to the controller.
Here the simple bit of code:
using System.Net.Http;
using System.Threading;
using System.Threading.Tasks;

namespace WebApi.CorrelationId.MessageHandlers
{
    public class AddCorrelationIdToResponseHandler : DelegatingHandler
    {
        private const string CorrelationIdHeaderName = "X-Correlation-Id";

        protected override async Task<HttpResponseMessage> SendAsync(HttpRequestMessage request, CancellationToken cancellationToken)
        {
            var responseMessage = await base.SendAsync(request, cancellationToken);

            responseMessage
                .Headers
                .Add(CorrelationIdHeaderName, request.GetCorrelationId().ToString());

            return responseMessage;
        }
    }
}
We also need to add this message handler to the ASP.NET Web API configuration:
var httpConfiguration = new HttpConfiguration();

// your regular configuration

httpConfiguration.MessageHandlers.Add(new AddCorrelationIdToResponseHandler());
Very easy indeed. Let the request execute, and just before letting the response go “up” the pipeline, add a new header to it. I also take advantage of ASP.NET Web API having the correlation ID built-in thanks to an extension method on HttpRequestMessage. The implementation of the method itself is pretty straightforward: check in the properties of the request if a correlation ID already exists; it does? great, return it. no luck? create one and store it in the request so the same one is returned for the lifetime of the request. You can check it here.
Including it in the logs
Every request will send a unique ID back to the client, but how can we correlate this to our own logging system? How can we know what happened during a request if we’re given a correlation ID?
In this case, I’m using the awesome logging library Serilog, and it’s again very easy to achieve what we want. Serilog has a notion of log context which allows us to add properties for a certain time. We know we want that ID for the lifetime of the request, so again a message handler fits perfectly:
using System.Net.Http;
using System.Threading;
using System.Threading.Tasks;
using Serilog.Context;

namespace WebApi.CorrelationId.MessageHandlers
{
    public class AddCorrelationIdToLogContextHandler : DelegatingHandler
    {
        protected override async Task<HttpResponseMessage> SendAsync(HttpRequestMessage request, CancellationToken cancellationToken)
        {
            using (LogContext.PushProperty("CorrelationId", request.GetCorrelationId()))
            {
                return await base.SendAsync(request, cancellationToken);
            }
        }
    }
}
The using keyword makes it very easy to understand that the property CorrelationId will be in the log context during the whole request. Serilog now needs to be aware that we intend to enrich the logging context with the LogContext and that we expect the CorrelationId property to be output for every log entry.
var logger = new LoggerConfiguration()
    .WriteTo.LiterateConsole(outputTemplate: "[{Timestamp:HH:mm:ss} {Level} {CorrelationId}] {Message}{NewLine}{Exception}")
    .EnrichWith.LogContext()
    .CreateLogger();
Because the default output template doesn’t know about our custom property, it’s just a matter of including it. Like for the first message handler, we have to include it in the configuration for it to be run.
As an example, if we declare a very simple controller:
using System.Web.Http;
using Serilog;

namespace WebApi.CorrelationId
{
    public class HomeController : ApiController
    {
        [Route("home")]
        public void Get()
        {
            Log.Information("Executing /home");
        }
    }
}
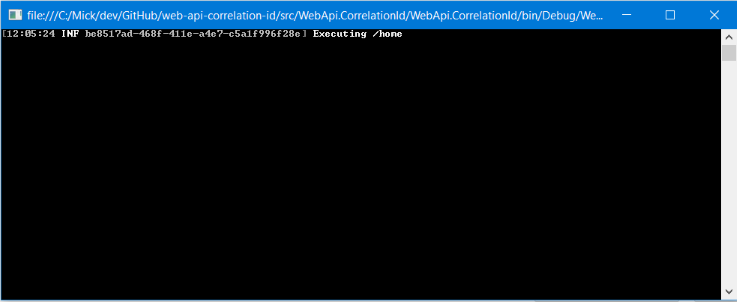
Here’s what gets output in the console:
What about ASP.NET MVC Core?
I wondered how different this would be to achieve with ASP.NET MVC Core. It turns out the idea is the same, but the implementation is a bit different. Message handlers don’t exist anymore, so we have to write ASP.NET Core middlewares.
using System.Threading.Tasks;
using Microsoft.AspNetCore.Http;

namespace AspNetMvcCore.CorrelationId.Middleware
{
    public class AddCorrelationIdToResponseMiddleware
    {
        private const string CorrelationIdHeaderName = "X-Correlation-Id";
        private readonly RequestDelegate _next;

        public AddCorrelationIdToResponseMiddleware(RequestDelegate next)
        {
            _next = next;
        }

        public Task Invoke(HttpContext context)
        {
            context
                .Response
                .Headers
                .Add(CorrelationIdHeaderName, context.TraceIdentifier);

            return _next(context);
        }
    }
}
using System.Threading.Tasks;
using Microsoft.AspNetCore.Http;
using Serilog.Context;

namespace AspNetMvcCore.CorrelationId.Middleware
{
    public class AddCorrelationIdToLogContextMiddleware
    {
        private readonly RequestDelegate _next;

        public AddCorrelationIdToLogContextMiddleware(RequestDelegate next)
        {
            _next = next;
        }

        public async Task Invoke(HttpContext context)
        {
            using (LogContext.PushProperty("CorrelationId", context.TraceIdentifier))
            {
                await _next(context);
            }
        }
    }
}
The Serilog configuration, however, stays exactly the same.
You can find the code associated with this post on GitHub.
21 Aug 2016

I’ve been using OpenID Connect for some time now.
OIDC is a specification built on top of OAuth 2 to which it adds authentication capabilities, where OAuth only provides autorisation.
It’s been around for a couple of years now and big names in IT like Google and Microsoft have adopted it.
If you want to know more about it, I would suggest reading the official spec. If the specness of the document is a bit scary, the docs from Google and Microsoft will feel more user-friendly.
Hosting your own Identity Provider
Being a .NET developer, I came across IdentityServer, a .NET implementation of the OpenID Connect specification.
This means you can run your OpenID Connect compliant server in less than 10 minutes.
The creators and main contributors of the project, Dominick Baier and Brock Allen, have been doing a wonderful job over the years as IdentityServer is extensible and very easy to use.
Out of the box, it comes with several adapters, so you can hook it with ASP.NET Identity or MembershipReboot, Brock Allen’s own vision of what an identity management and authentication system should look like.
You can also store IdentityServer’s configuration with Entity Framework.
Last but not least, the team is already working on an ASP.NET Core version.
What about client applications?
Identity Server also comes with a library that allows to protect your ASP.NET Web API with Identity Server in minutes.
Wiring it is so easy you might forget how much complexity it takes care of.
There can be many roundtrips between your client application and the Identity Provider, and the client has to validate the different tokens it receives.
The validation can involve X.509 certificates, encryption and hashing algorithms and other non-trivial operations.
What does it take to create a JS client application?
You might be wondering how much work would be involved if you were to create a JS-only application that would delegate authentication to an OpenID Connect provider.
Getting tokens, validating them, renewing them when they are about to expire…
The IdentityServer team had created oidc-token-manager which took care of most aspects of dealing with an OpenID Connect identity provider.
A specific aspect of JS applications built with OpenID Connect is the session management.
In a nutshell, it allows the JS application to be notified if the user’s session state at the IdP has changed - let’s say because they logged out.
Implementing that feature in a JS application is not trivial since, to minimise network traffic between the application and the IdP, it is based on the client application loading a hidden iframe from the IdP and polling it with the postMessage API.
While being an amazing library, oidc-token-manager didn’t help much when it came to implementing that specific feature.
Luckily for us, the Identity Server has been hard at work and created oidc-client-js, the successor of oidc-token-manager.
From their creators:
[oidc-client-js is a] library to provide OpenID Connect (OIDC) and OAuth2 protocol support for client-side, browser-based JavaScript client applications. Also included is support for user session and access token management.
Wait, user session management?!
That’s right, user session management!
And it’s enabled by default - look for monitorSession.
This means that as soon as a user is logged in, the library takes care of creating the hidden iframe from the OIDC IdP, and polls it at a regular and configurable interval to be aware of a potential change in the user session. Madness!
If it detects it’s changed, it will raise an event that’s very easy to handle
For those who have already used oidc-token-manager, the API is similar, so it’s pretty easy to make the shift.
Show me the code!
Here’s a small commented example of what the library can do.
var settings = {
    // URL of your OpenID Connect server.
    // The library uses it to access the metadata document
    authority: 'https://localhost:44300',

    client_id: 'js',

    popup_redirect_uri: 'http://localhost:56668/popup.html',
    silent_redirect_uri: 'http://localhost:56668/silent-renew.html',
    post_logout_redirect_uri: 'http://localhost:56668/index.html',

    // What you expect back from The IdP.
    // In that case, like for all JS-based applications, an identity token
    // and an access token
    response_type: 'id_token token',

    // Scopes requested during the authorisation request
    scope: 'openid profile email api',

    // Number of seconds before the token expires to trigger
    // the `tokenExpiring` event
    accessTokenExpiringNotificationTime: 4,

    // Do we want to renew the access token automatically when it's
    // about to expire?
    automaticSilentRenew: true,

    // Do we want to filter OIDC protocal-specific claims from the response?
    filterProtocolClaims: true
};

// `UserManager` is the main class exposed by the library
var manager = new Oidc.UserManager(settings);
var user;

// You can hook a logger to the library.
// Conveniently, the methods exposed by the logger match
// the `console` object
Oidc.Log.logger = console;

// When a user logs in successfully or a token is renewed, the `userLoaded`
// event is fired. the `addUserLoaded` method allows to register a callback to
// that event
manager.events.addUserLoaded(function (loadedUser) {
    user = loadedUser;
    display('.js-user', user);
});

// Same mechanism for when the automatic renewal of a token fails
manager.events.addSilentRenewError(function (error) {
    console.error('error while renewing the access token', error);
});

// When the automatic session management feature detects a change in
// the user session state, the `userSignedOut` event is fired.
manager.events.addUserSignedOut(function () {
    alert('The user has signed out');
});

// In that case, we want the library to open a popup for the user
// to log in. Another possibility is to load the login form in the main window.
$('.js-login').on('click', function () {
    manager
        .signinPopup()
        .catch(function (error) {
            console.error('error while logging in through the popup', error);
        });
});

// Here we want to redirect the user to the IdP logout page in the main window.
// We can also choose to do it in a hidden `iframe`
$('.js-logout').on('click', function () {
    manager
        .signoutRedirect()
        .catch(function (error) {
            console.error('error while signing out user', error);
        });
});
As you can see, using the library is very easy.
It’s also worth to mention that if you’re using TypeScript, you’re covered as the library also comes with a definition file.
If you want to try using oidc-client-js, the Identity Server JS walkthrough has been updated to use it.
06 Aug 2016

I’m working on a project that contains 100+ git repositories. They are linked in the sense that the main repository has dependencies on the other ones.
An issue we’re facing comes from the fact that the CI build is only triggered when a PR is merged on that main repo, which is far from being the most active one. As a result we have to manually queue a build every time a PR on any other repo is merged.
To overcome this, I’ve decided to play with TFS webhooks and the REST API. The idea is to be notified by a webhook when a pull request on any repo is merged so we can queue a build for the main repository through the REST API.
What are webhooks?
Webhooks are a way for applications to provide notifications to external systems when specific events occur. Most of the time, the source application makes an HTTP request to the URL configured for the webhook, passing relevant data depending on the event. Several services provide webhooks support, like GitHub or Slack.
TFS 2015 and VSTS also support webhooks for a variety of events. In our case the one we’re interested in it is when a pull request is updated
I hear you saying that the pull request merged event suits perfectly our needs. You’re right, but these docs are for VSTS, and TFS - 2015 Update 2, which we’re using - does not support this event.
Great! So how do we put everything together?
While my first idea was to create a hand-rolled API to get these notifications, a quick online search pointed me to ASP.NET WebHooks, a library to produce and consume webhooks.
Out of the box, it provides several connectors to consume webhooks from different services, one of which is VSTS.
Despite still being a pre-release, I decided to give it a go. It turned out to be very easy to setup. The official documentation was quite slim, but the extensive samples made up for it. This library is distributed via NuGet with the Microsoft.AspNet.WebHooks.Receivers and Microsoft.AspNet.WebHooks.Receivers.VSTS packages.
Enabling webhooks support is a matter of calling an extensoin method on the HttpConfiguration class.
public class Startup
{
    public void Configuration(IAppBuilder app)
    {
        var httpConfiguration = new HttpConfiguration();
        httpConfiguration.MapHttpAttributeRoutes();
        httpConfiguration.InitializeReceiveVstsWebHooks();

        app.UseWebApi(httpConfiguration);
    }
}
The next step is to create a handler class that gets registered automatically through ASP.NET Web API assembly resolution system.
public class VstsWebHookHandler : VstsWebHookHandlerBase
{
    public override async Task ExecuteAsync(WebHookHandlerContext context, GitPullRequestUpdatedPayload payload)
    {
        return Task.FromResult(true);
    }
}
The base class defines multiple virtual methods, one for each supported TFS event. The GitPullRequestUpdatedPayload class is a strong;y-typed representation of the JSON payload TFS sends as part of the request. It contains lots of information such as the repository on which the pull request was created, the target branch or the status of the pull request.
Queuing a new build
If the pull request matches our criteria, we can queue a new build by calling the TFS REST API.
Again, I was thinking of using the HttpClient class to do so, but there’s an official .NET client library.
Several NuGet packages must be installed in this case: Microsoft.TeamFoundationServer.Client, Microsoft.VisualStudio.Services.Client and Microsoft.VisualStudio.Services.InteractiveClient.
The .NET API is not very discoverable, and the documentation is here very sparse, but queuing a build is easy
var connection = new VssConnection(
    new Uri("https://tfs/DefaultCollection"),
    new VssCredentials(true)); // Use default credentials

var buildClient = await connection.GetClientAsync<BuildHttpClient>();
var buildDefinitions = await buildClient.GetBuildDefinitionsAsync("TeamProjectName", "BuildDefinitionName");

if (buildDefinitions.Count > 0)
{
    var buildDefinition = buildDefinitions[0];
    var newBuild = new Build
    {
        Definition = new DefinitionReference
        {
            Id = buildDefinition.Id
        },
        Project = buildDefinition.Project
    };

    await buildClient.QueueBuildAsync(newBuild);
}
Going one step further
In our case, working on a feature often involves working on different repositories, hence multiple PRs. Since we don’t want to queue n PRs related to a single feature, some smarts were introduced so a new build is not queued if there’s already one in the queue - not currently running.
You can have a look at the solution we ended up with on this GitHub repository. While the NTLM authentication works with an on-premise installation of TFS, it would require some modifications to work with VSTS.
03 Nov 2015
I feel like there’s a misunderstanding about some of the attributes that we can apply to properties in Polymer. Let’s go through them.
reflectToAttribute
This is to me the most misused attribute.
I haven’t been doing Polymer for very long, and I got this one completely wrong at first.
I thought that in order to have a property bindable, we had to throw this attribute on it. This is wrong, as every property we declare is by default bindable, except of course for the ones having the readOnly or computed attribute.
What the reflectToAttribute does is instruct Polymer that it has to serialise the property’s value to an HTML attribute on the actual HTML element representing our component.
Let’s say we have the following element declaration:
Polymer({
  is: 'my-element',
  properties: {
    tasks: {
      type: Array,
      reflectToAttribute: true
    }
  }
});
and we bind an array to that property. This is what the DOM could look like:
<my-element tasks='[{"id":1,"name":"foo"},{"id":2,"name":"bar"}]'>
</my-element>
This is bad because we may not want to expose all that data directly in the DOM. Plus, there must be some performance overhead associated with the serialisation of the value every time it changes.
When to use it, then?
Great question!
So far, I’ve only seen one case where it’s useful to use it, and that is CSS styling.
Given the property and its value will be represented as an HTML attribute, we can then have specific CSS rules depending on:
- the existence of the attribute
- the value of the attribute
A good example is the paper-button and its raised property.
We can see on the declaration of the raised property that it has the reflectToAttribute set to true.
In the associated styles, here and there, we have specific style rules are applied if the element has the raised attribute.
Boolean properties are special because the way Polymer treats them is the following: the attribute will exist only if the value is true, and it will have no value - like the common checked and disabled attributes on input - otherwise it won’t be present.
So most of the time, we won’t need that attribute, so I think a good practice - and this applies to the following attribute, too - is not to throw it automatically on every property.
notify
This attribute is often applied to properties without an analysis of whether it’s really needed or not. It has to do with child-to-host binding.
It is useful only if we want a parent element to be notified that the property of your component changed, and by the same time update the property of the parent element to which it is bound. I hope that makes sense.
Let’s see an example:
<dom-module id="my-child-element">
  <template>
  </template>
  <script>
    Polymer({
      is: 'my-child-element',
      properties: {
        notifier: {
          type: String,
          notify: true
        }
      }
    });
  </script>
</dom-module>

<dom-module id="my-parent-element">
  <template>
    <my-child-element notifier="">
    </my-child-element>
  </template>
  <script>
    Polymer({
      is: 'my-parent-element',
      properties: {
        notified: String
      }
    });
  </script>
</dom-module>
In this case it makes sense to have notify: true on the notify property because we want the notified property of the parent element to be automatically updated when notifier changes. What we have here is a child-to-host data flow. Also notice the use of curly braces in the binding, which are necessary to have the parent element’s property updated automatically.
Let’s now imagine we only want to propagate the value from the host to the child, that is to the parent to the child element. We can modify our code:
<dom-module id="my-child-element">
  <template>
  </template>
  <script>
    Polymer({
      is: 'my-child-element',
      properties: {
        destination: String
      }
    });
  </script>
</dom-module>

<dom-module id="my-parent-element">
  <template>
    <my-child-element destination="[[source]]">
    </my-child-element>
  </template>
  <script>
    Polymer({
      is: 'my-parent-element',
      properties: {
        source: String
      }
    });
  </script>
</dom-module>
The names of the properties were changed so that they still make sense. We now face a host-to-child data flow. Because the destination property doesn’t have the notify attribute, it doesn’t make sense to use curly braces anymore, so we swapped them for square ones.
It’s not always easy to figure out if a property will have to let know a parent element that its value has changed, especially when we deal with global components that are used all over the code base. But for some higher level components, let’s say at the page level, it’s easier to figure out the scope of the properties and apply the notify attribute correctly.
readOnly
I personally like this attribute and I think I don’t use it as often as I could. Applying it to a property prevents that property from being changed via direct assignment or data-binding. Polymer creates under the hood a private function that allows the change its value. I say private (you should see air quotes, here) because the function is not really private, in the sense that another component could call it.
See this example:
Polymer({
  is: 'my-element',
  properties: {
    internalState: {
      type: String,
      readOnly: true
    }
  }
});
As stated earlier, the internalState property could not be modified with binding or direct assignment, but Polymer created for us a _setInternalState function that allows us to change the value of the property. Still, another component could invoke this function, but we know we’re badass when we invoke a function starting with an underscore, right?
This attribute allows us to implicitly state that the value of this property is the sole responsibility of the component it’s defined in. But this property could be used by a parent component!
A great example comes from Polymer itself in the iron-media-query element. It has 2 properties:
- The
query property in which we pass the media query we target
- The
queryMatches property, which value is a Boolean taht indicates if the media query is matched or not
Now, it’s the responsibility of the iron-media-query element to determine if the media query is matched or not, and it doesn’t want us to trick it, so the queryMatches property is defined with the readOnly attribute.
<dom-module id="my-element">
  <template>
     <iron-media-query query="(max-width: 768px)" query-matches=""></iron-media-query>
  </template>
  <script>
    Polymer({
      is: 'my-element',
      properties: {
        isSmartphone: Boolean
      }
    });
  </script>
</dom-module>
We give the element an input from which it computes some value and returns it back to us, all of that with automatic binding. Easier would be hard to achieve.
A small words about braces
This is not actually about properties attributes, but I feel like it fits well with the general message of the post.
My rule of thumb is the following: always use square braces if I don’t expect a child-to-host data flow.
This applies to more places than you’d think:
<template is="dom-if" if="[[applyLogic(myProperty)]]">
</template>

<template is="dom-repeat" items="[[myItems]]">
</template>

<span>[[myLabel]]</span>
There is no way we’ll get data back in these cases, so why not make it even more obvious by using square braces?
I don’t know if there’s actually a performance penalty when using curly braces, but let’s play it safe, and the visual cue of the square braces is a good enough reason for me.
